
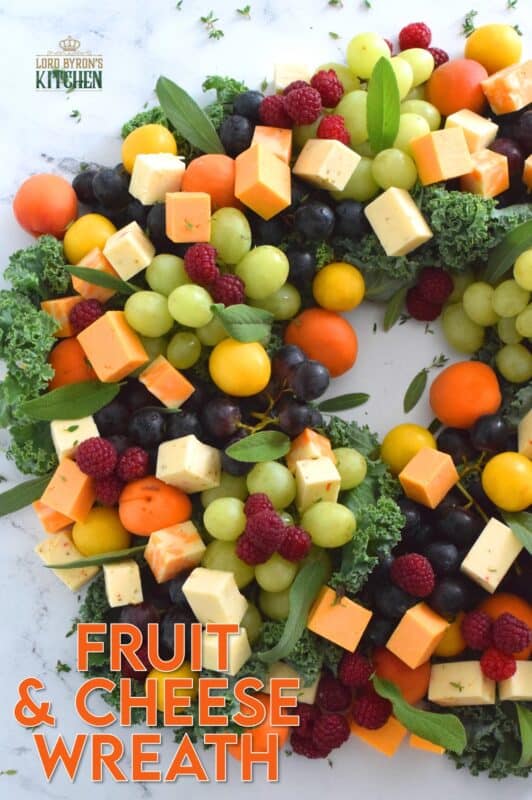
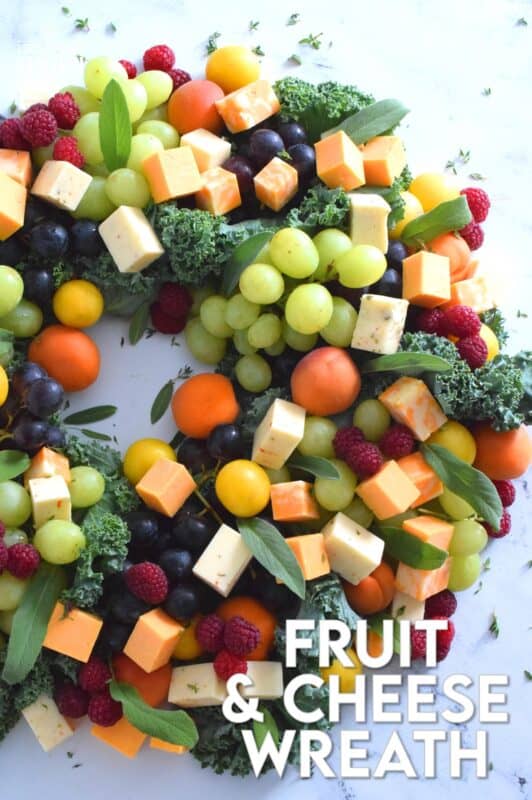
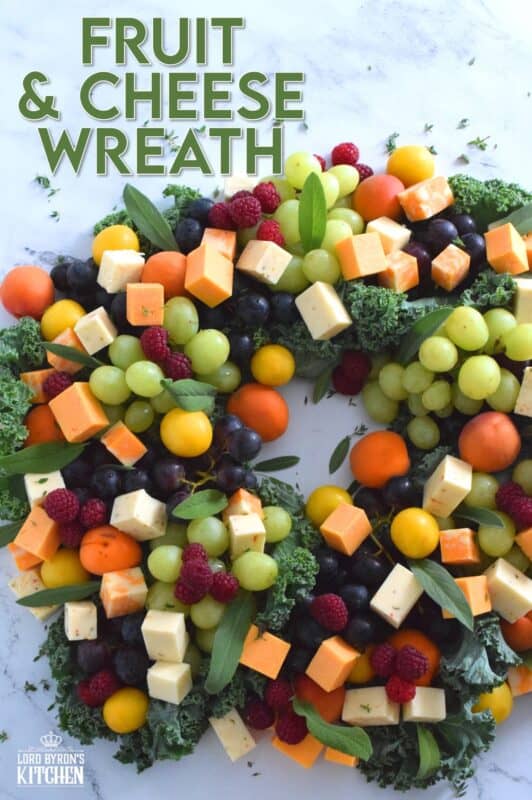
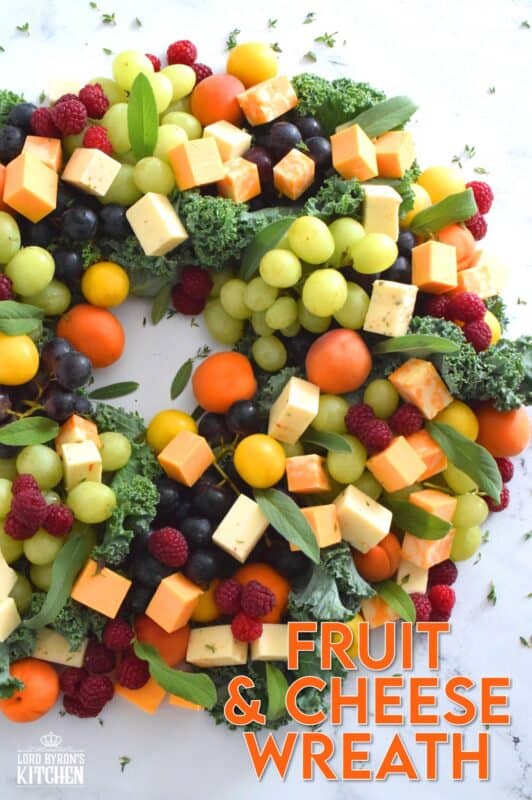
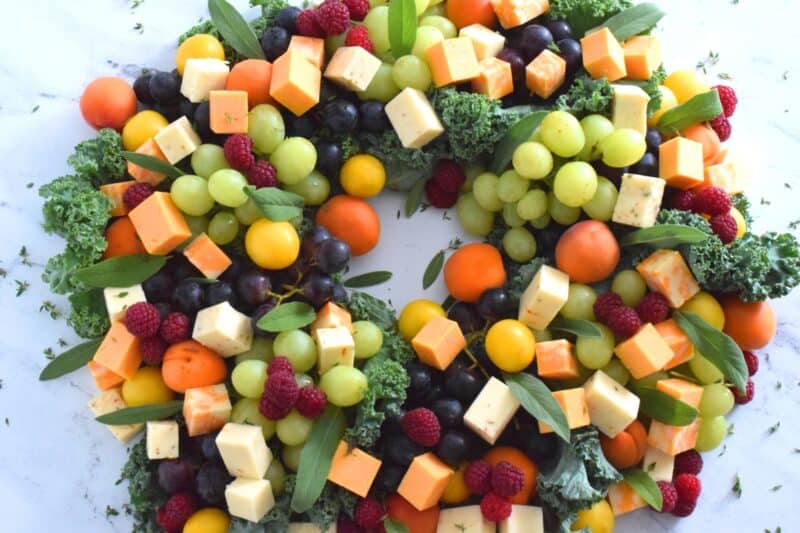
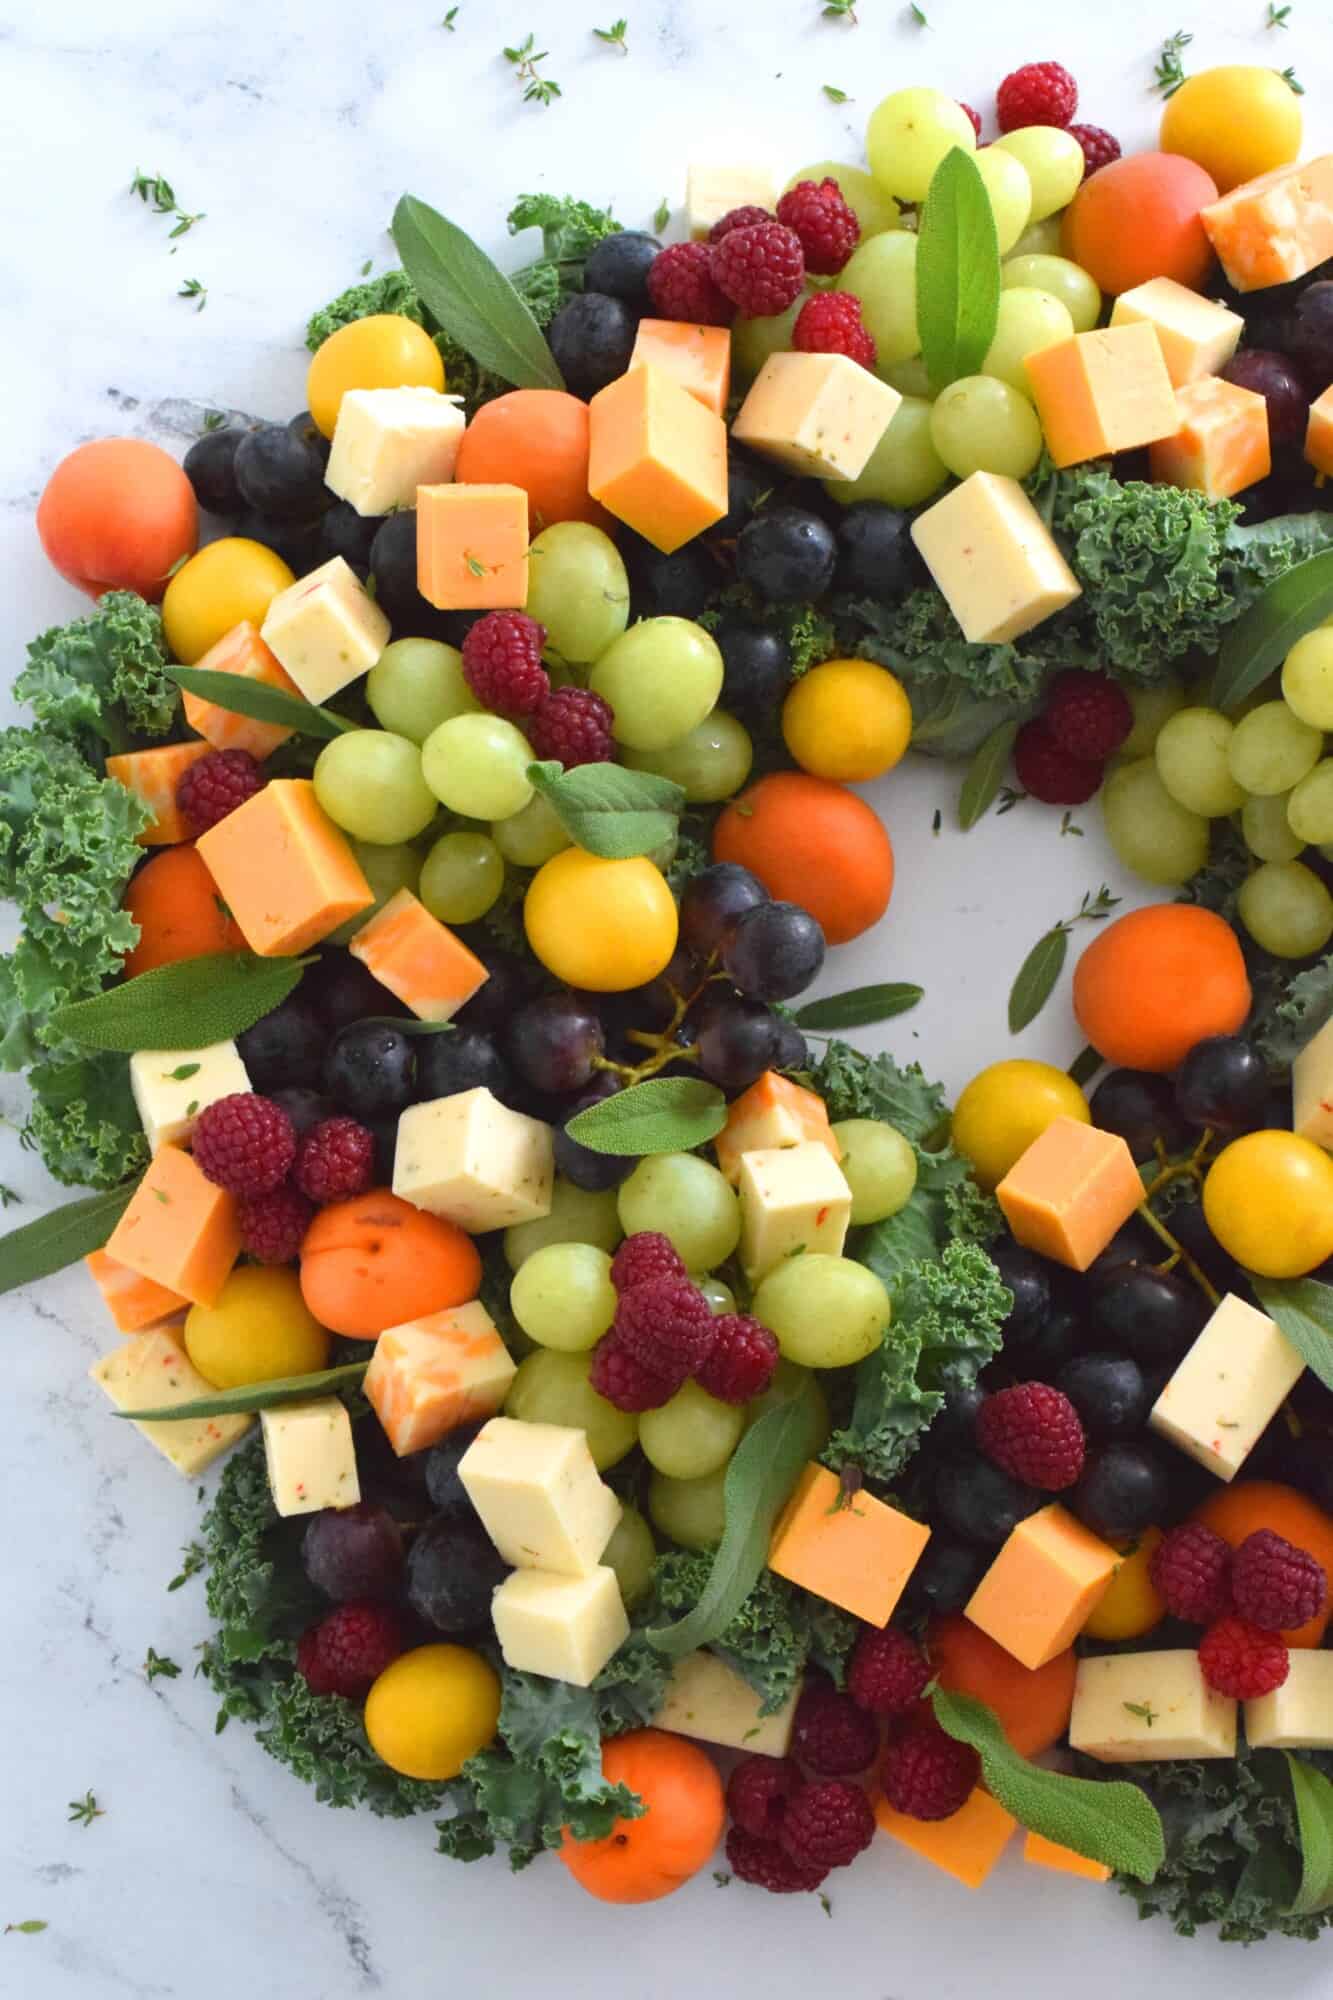
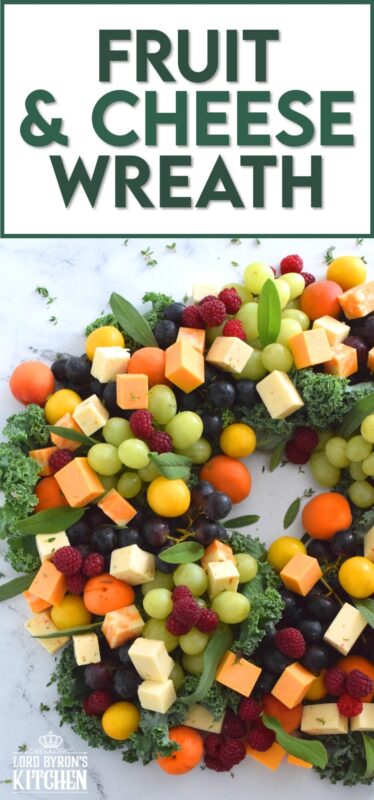
An edible wreath consisting of red and green grapes, fresh apricots, tart plums, vibrantly red raspberries, and various types of cheese, this beautifully festive Fruit and Cheese Wreath is a wonderful way to organize and display finger foods before serving them to your guests this holiday season!
November is quickly approaching, Dear Reader. Do you know what that means? In my world, it means that summer is over, fall is in full swing, Halloween is almost behind us, and Christmas is at hand! If you’ve been a reader of my blog for some time, you will most certainly have read that I am a huge fan of Christmas. So, pretty much as soon as the leaves change colour, Christmas celebrations begin in our home! Let’s get started with this Fruit and Cheese Wreath!!
So, with that said, today marks the first day of Christmas-related/themed recipes that I will share with you over the next little while. Every year, not only do I share my annual 24 Cookies of Christmas with you, but I also share what I like to think of as a mini countdown series. They consist of 12 recipes in total, all with one particular theme in mind.
Make your own online recipe box!
Click the in the lower right corner of your screen
& follow the quick and easy instructions!
My take on a Fruit and Cheese Wreath is the first in my 12 Edible Wreaths of Christmas Series. Please join me for 12 consecutive days – yes, even Saturday and Sunday! – while I share one new edible wreath with you every day. If you cannot wait until tomorrow, you can always check out a series from Christmases past. Find the links for each series below!
Looking For More Christmas Confections?
Lord Byron’s Kitchen has more than enough to satisfy your sweet tooth! Click on the links below to see a countdown series of holiday recipes from that category!
EDIBLE WREATHS ARE THE CHARCUTERIE OF CHRISTMAS!
Charcuterie boards are everywhere these days, and it seems that there’s a theme for just about everything. With that in mind, why not create wreath-shaped charcuterie boards for Christmastime!? I started out with a few varieties in mind, but the more I thought about it, the more I loved the idea and before long, I had a list of twenty themes. Narrowing it down to 12 was hard, but I managed to put some of the themes aside until next year!
With an abundance of our favourite fruits and berries, and a copious amount of inexpensive, but delicious, store-bought cheeses, I put together this Fruit and Cheese Wreath quite quickly and easily. Everything you see in the wreath is store-bought, which means all you have to do is assemble it. Christmastime is busy enough as it is! Putting out a nice spread for friends and family shouldn’t add to your holiday stress!
Most charcuterie boards will also include thinly sliced meats, olives, and pickles. And, you can certainly add those things to your wreath if you’re putting it out before dinner as an appetizer. But, in this case, I’m keeping these wreaths sweet, simple, and very on-theme.
WHAT IS CHARCUTERIE ANYWAY?
Charcuterie is a French term meaning “flesh” and “cooked.” It is a branch of cooking devoted to prepared meat products, such as bacon, ham, sausage, terrines, and pate, etc. Originally intended as a way to preserve meat before the advent of refrigeration, they are prepared today for the flavours derived from the preservation processes.
Today, when we hear the term charcuterie, most of us immediately know that we are referring to the preparation and artful assembling of arranging items like cured meats, hard and soft cheeses, dried and fresh fruits, vegetables, and crackers or bread on a large wooden board.
Charcuterie has been popular in many parts of Europe for many, many years. In fact, there’s documented evidence of charcuterie being present in ancient Roman times. The popularity of these boards did not catch on here in North America until recently. Now, they’re everywhere! And, I’m going to show you how to make wreath-shaped charcuterie boards specifically for Christmas!
INGREDIENTS NEEDED FOR THIS RECIPE:
The following is a list of the items needed to prepare a Fruit and Cheese Wreath. Please keep in mind that the number of items you will need will greatly depend on how many people you are preparing the wreath for. Also, these items are suggestions only. Feel free to switch it up with things that you love, or things that you can find in your local area.
- Kale – In this recipe, the kale is not consumed. It is merely a vessel for holding the fruit, berries, and cheese. Using kale to form a wreath bed is optional, but it certainly does add to the overall look of the finished product. Presentation is key!
- Fruit – Use your favourite fruits. I’m using fruit that can easily be eaten without worry about seeds or anything that needs to be discarded like peel, for example. I know apricots and plums have seeds, but I wanted the brightness in colours to contrast with the overall green look of the wreath. Place a bunch of cocktail napkins close by for your guest to discreetly spit out the seed.
- Berries – Just like the fruit, you can use any berries. I only selected raspberries, because we both love them and I wanted to add some red to the wreath. The raspberries are small and look like holly when placed in bunches of three or four.
- Cheese – A few types of cheese will work best, but you can certainly use all of one flavour or colour. I used four types with different colours, patterns, and flavours, like sharp orange cheddar, mild marble cheese, some nutty gouda, and finally, a spicy jalapeno Havarti.
- Fresh Sage & Thyme – These are used for garnish but are completely edible, so do feel free to use lots!
HOW THE INGREDIENTS COME TOGETHER TO FORM A WREATH
1. Make a Bed
If you have a wooden or marble circular cutting board at home, you can certainly use it as a bed for your wreath. You can actually use any cutting board you have and create a circular shape by positioning the ingredients accordingly. I love my large charcuterie board so much that I’m nervous about staining it, so rather than risk grease stains from the cheese, or red juice from the raspberries, make a bed of kale. It was super easy!
Grab a bunch of kale from your local grocery store. Wash it and spin it dry in a salad spinner. Cut the ends away and discard. Lay the large kale leaves out onto your cutting board or any work surface you plan to use in a circular pattern. It not only acts as a barrier between the board and the food, but it also adds height and beautiful wreath-like colour!
2. Various Fruits and Berries
Pick fruits and berries that you like to eat! You can be very selective and choose only green fruits and berries or only red fruits and berries. Or, you can use fruits and berries that are in season. For my board, I choose fruits that we love to eat and also I picked a few that would add to the overall look of the wreath.
We love to pair grapes with cheese, so that was an easy choice. I picked up a bunch of green grapes and a bunch of red grapes, both of which were seedless. Then, I picked up apricots, because they are bright orange and remind me of those little clementines that are so popular at Christmastime. Next, I got some yellow plums – they are my all-time favourite fruit! Finally, I picked up some raspberries to add a little bit of red colour to the wreath. Remember, we eat with our eyes first!
3. Cheese
Who doesn’t love cheese!? For this Fruit and Cheese Wreath, I wanted to add a few different kinds of cheese that would appeal to everyone’s tastes, but not break the bank at the same time. We all know that cheese can be quite expensive, so only buy what you can afford. The mass-produced brick-style cheese is just fine for a board like this! I am using a sharp orange cheddar, mild marble cheese, some nutty gouda, and finally, a spicy jalapeno Havarti.
Cut the cheese into cubes rather than slices. Remember that the smaller the piece of cheese, the faster it will begin to sweat. Room-temperature cheese is always the best in terms of flavour, but if it’s too warm, the moisture content in the cheese will be released, causing sweat – or condensation – on the cheese. Cubing the cheese not only helps to form a wreath shape easier but will help to prevent sweating.
4. Finishing Touches
A Fruit and Cheese Wreath-style charcuterie would not be complete without greenery! Even though I used a circular bed of kale as the base for my wreath, I wanted to add a few pops of green to the top of the wreath as well. This can be done quite easily, and the good news is that it isn’t only just for prettiness, it can also help with developing flavour!
In my case, I’m using fresh sage leaves that I have washed and gently patted dry with paper towels. I have tucked the leaves into the fruit and cheese wreath randomly. Next, I removed the leaves from a few sprigs of fresh thyme and sprinkled them all over the top of the wreath, allowing them to fall around the outer perimeter too. This will create colour and contrast, and most certainly will contribute to the overall look of an actual wreath.
Lord Byron’s Annual Christmas Cookie Series
Did you know that Lord Byron’s Kitchen has been sharing a 24 Cookies of Christmas Series for the past several years? Click on the links below to see all of the recipes from each series on one page!
HOW TO ASSEMBLE A FRUIT AND CHEESE WREATH
CREATE A BASE
The first thing you want to do is to source a board. The number of people you are serving and the number of items you have to place on the board will help to determine the size you will need. You can use a cutting board, a charcuterie board, or even a large marble slab like you see in the photographs. Any of those types of boards can be found at any home decor store, like Marshalls or Winners.
Next, using freshly washed and dried kale, create a circular pattern on the board. Position the leaves of kale so that the leafy end is pointing out from the center of the board. The size of the wreath will be determined by how much fruit, berries, and cheese you will be piling onto it, so size the wreath accordingly. It’s always best to make the kale wreath a little bigger so that the green leaves are not completely covered with food. Once you’re happy with the positioning of the kale, it’s time to assemble it.
POSITIONING THE FOOD
Many, many years ago, I used to work at Pizza Hut. I can still remember how we were taught to layer the pepperoni slices on the sauce. First, we would lay one slice of pepperoni at 12, 3, 6, and 9 o’clock. Three slices of pepperoni would be placed between each of those spots for a total of 16 slices around the perimeter of the dough. Next, we would repeat the pattern on the inside of that pepperoni ring. So, once again, at 12, 3, 6, and 9 o’clock, we would place one slice of pepperoni. Between those, we would lay two slices of pepperoni. So, now we have two circles of pepperoni for a total of 28 slices.
Finally, with only a small space left in the middle of the pizza, we would place 4 more slices of pepperoni in a box pattern for a total of 32 slices. I do hope Pizza Hut does not come after me if that was one of their trade secrets! Nevertheless, I still apply the same technique whenever I’m baking, cooking, or assembling food in the shape of a circle. Start by laying down small bunches of grapes, alternating between green and red. Next, fill in some of those gaps with the cubed cheese. Remember to alternate the flavours and colours of cheese.
Finally, add in a few pops of colour with yellow plums and orange apricots. Dot the top of the wreath with little clusters of bright red raspberries. You can use single grapes to fill in any remaining gaps too rather than using bunches. Lastly, tuck in your sage leaves and sprinkle over the fresh thyme leaves. It looks gorgeous and takes very little time or skill, doesn’t it!?
MAKE IT AHEAD OF TIME
You can make this Fruit and Cheese Wreath earlier on the day you are serving it, however, I would not make it a day or two in advance. There most certainly will be some moisture on the fruit and berries, which will make the cheese wet and soggy in spots if left to sit too long. If you do make it ahead of time, I would not recommend any longer than 8-12 hours. Cover the board well and keep it refrigerated until about 20 minutes before serving.
If you need to make this wreath in advance, you can, but don’t assemble it. Wash and dry the kale. Wash and pat the fruit and berries dry. Cube the cheese. Wash and dry the sage and thyme. Package everything up in food-safe containers individually. It will keep in the fridge for 2-3 days depending on the freshness of the kale, fruit, and berries when you purchased them. When ready to assemble, take everything out of the fridge and layer it as described in the section above.

Do You Like This Recipe?
You should consider trying these other delicious recipes too!


Fruit and Cheese Wreath
Ingredients
- 1 pound green seedless grapes, washed and patted dry
- 1 pound red seedless grapes, washed and patted dry
- 1/2 pint raspberries, washed and patted dry
- 1 pound fresh apricots, washed and dried
- 1/2 pound yellow plums, washed and dried
- 1 pound sharp cheddar cheese, cut into 1 inch cubes
- 1 pound marble cheese, cut into 1 inch cubes
- 1 pound gouda, cut into 1 inch cubes
- 1 pound spicy jalapeno havarti, cut into 1 inch cubes
- 1 bunch kale, washed and spun dry in a salad spinner
- sage leaves
- thyme leaves
Instructions
- Using freshly washed and dried kale, create a circular pattern on the board. Position the leaves of kale so that the leafy end is pointing out from the center of the board. The size of the wreath will be determined by how much fruit, berries, and cheese you will be piling onto it, so size the wreath accordingly. It’s always best to make the kale wreath a little bigger so that the green leaves are not completely covered with food. Once you’re happy with the positioning of the kale, it’s time to assemble.
- To assemble the wreath, start by laying down small bunches of grapes, alternating between green and red.
- Next, fill in some of those gaps with the cubed cheese. Remember to alternate the flavours and colours of cheese.
- Finally, add in a few pops of colour with yellow plums and orange apricots.
- Dot the top of the wreath with little clusters of bright red raspberries.
- You can use single grapes to fill in any remaining gaps too rather than using bunches.
- Lastly, tuck in your sage leaves and sprinkle over the fresh thyme leaves.
- Serve immediately or cover and refrigerate for up to 8 hours. Remove from fridge and allow to sit at room temperature for 20 mintues before serving.
Notes
Nutrition
Did you make this recipe?
Upload a photo and tag me so that I can see it!


Leave a Reply